Saturday, May 27, 2006

Grillo, il Berlusconi del Web2.0?

The image “http://www.beppegrillo.it/archives/fotografie/beppe-grillo-33.jpg” cannot be displayed, because it contains errors.

La television la g'a' una forza de leon!!!
La discesa in campo di Berlusconi, di 13 anni fa venne salutata, annunciata e appoggiata dagli *artisti* delle sue TV, con fresco entusiasmo e spontaneo trasporto direbbero loro, con impeto e ardimento dico io. "Questa volta io voto per un amico" disse Vianello durante una trasmissione sportiva, senza che nessuno glielo chiedesse naturalmente.
Ieri, collegandomi per la decima volta in un giorno al mio bloglines, vedo una news sul blog di Grillo, la apro e vedo il faccione di Dario Fo ed un suo articolo-spottone-elettorale ospitato nel blog del comico. Niente contro Fo, e niente contro Grillo fino a questo punto, ma ho provato la stessa sensazione di 13 anni fa di fronte al fatto che un signore che ha un seguito importante, un pubblico numeroso, una comunità che attende di consumare contenuti da quel canale, a un certo punto imponga, non solo un suo punto di vista od una sua opinione (ci mancherebbe, è il suo blog), uno spottone elettorale senza troppi problemi. La politica si preoccupa troppo di tenere sotto controllo la TV. E' troppo vecchia la nostra classe dirigente per capire che il web è il media del presente e non del futuro, quindi non se ne occupa, a parte Fo naturalmente. Per fortuna non se ne occupa dico io, perché se se ne occupasse chissà che sfacelo. Ma intanto mi rimane il dubbio, non è che dopo nani e ballerine da Arcore la prossima cultura da mass-media (o mess-media) dominante sarà quella del Grillo parlante?

Thursday, May 25, 2006

Web services REST con Python e Twisted in un secondo

(Foto by Very Good With Computers)


C'era bisogno di inventare i Web service in Soap così complicati, così interoperabili solo a parole, così pesanti da implementare, da testare e da mettere in moto? Forse no, c'è REST; c'è sempre stato; leggere questo per credere. In poche parole, qualsiasi applicazione web può essere progettata a partire dai dati e dalle 4 operazioni fondamentali che ci permettono di leggerli, crearli, modificarli e cancellarli. Manco a dirlo GET, POST, PUT e DELETE. I dati sono ad esempio ordini, descrizioni anagrafiche, prenotazioni, e questi possono essere in XML, oppure no. A che ci serve XML se poi la nostra applicazione usa solo come client HTML e Javascript? Molto meglio usare oggetti Javascript direttamente serializzati in formato JSON. Inoltre, Javascript e Python hanno in comune costrutti come questi:

a={“x”:32 , “y”:25}

b=[23,33, “I'm a string”]

c=[[34,35,36],[44, “s”]]

Queste espressioni sono valide sia in Python che in Javascript, e questo suggerisce che scrivendo il server in Python possiamo sviluppare web application basate su Ajax in tempo zero.


Vediamo un caso pratico. Costruiamo un web service che permetta di gestire una lista di utenti in modo che possiamo vedere la lista degli utenti, creare un nuovo utente, vedere i dettagli di un utente e cancellare un utente dalla lista. Per fare questo ci bastano due URL ed i quattro verbi dell'HTTP.


http://myserver/listUsers

da usare solo con GET


http://myserver/user?name=davide


POST crea un utente il cui name è davide

GET visualizza i dettagli di davide

PUT modifica l'utente davide

DELETE cancella davide dalla lista


Di seguito il codice che richiede, come ovvio, Twisted. Per testare le GET e POST potete usare un form HTML, mentre per PUT e DELETE dovrete usare Ajax o un altro client che vi consenta di usare questi metodi.

from twisted.internet import reactor
from twisted.web import server, resource
from twisted.web.static import File

user1={"name":"john", "surname":"smith", "age":23, "email":"john@foo.bar"}
user2={"name":"davide", "surname":"carboni", "age":35, "email":"davide@foo.bar"}
user3={"name":"stefano", "surname":"sanna", "age":32, "email":"stefano@foo.bar"}

users=[user1,user2,user3]

class Root(resource.Resource):
isLeaf=False
def render_GET(self, request):
return "Arkanoid?"


class ListUsers(resource.Resource):
isLeaf=True
def render_GET(self, request):
userList=[us['name'] for us in users]
return str(userList)


class User(resource.Resource):
isLeaf=True
def render_GET(self, request):
name=request.args['name'][0]
record=filter(lambda(x): name==x['name'], users)[0]
return str(record)


def render_POST(self,request):
record=eval(request.content.read())
#ATTENZIONE, L'UTILIZZO DI EVAL SU UN DATO TRASMESSO DALL'
#UTENTE E' UNA FALLA DI SICUREZZA. OCCORRE UTILIZZARE UN
#PARSER AD-HOC COME SIMPLEJSON

users.append(record)
return 'http://localhost/user?name=%s' % (record['name'])


def render_PUT(self,request):
name=request.args['name'][0]
newrecord=eval(request.content.read())
#ATTENZIONE, L'UTILIZZO DI EVAL SU UN DATO TRASMESSO DALL'
#UTENTE E' UNA FALLA DI SICUREZZA. OCCORRE UTILIZZARE UN
#PARSER AD-HOC COME SIMPLEJSON

oldrecord=filter(lambda(x): name==x['name'], users)[0]

for key in oldrecord:
oldrecord[key]=newrecord[key]

return "OK"

def render_DELETE(self,request):
name=request.args['name'][0]
record=filter(lambda(x): name==x['name'], users)[0]
users.remove(record)
return "OK"


if __name__ == "__main__":
root=Root()
root.putChild("user",User())
root.putChild("listUsers",ListUsers())
root.putChild("d",File("."))
site = server.Site(root)
reactor.listenTCP(8000, site)
reactor.run()


Tuesday, May 23, 2006

From Software to Webware


When the software became the only thing that matters


The history of Microsoft teaches us that moving a large base of PC IBM users to MSDOS was a successful idea. The role of sofware became strategic, and playing as software provider more profitable than playing the role of hardware manifacturer. From that moment on, the software, and the operating system, became the only thing that matters. The increasing number of applications for MSDOS caused users to become MSDOS dependant leaving the hardware to blur in the background without too many worries: users didn't matter if the PC was a real IBM or just a clone. So now, the operating system's no longer something that allows a system to operate, but it is the ultimate user tool, the desktop, the control panel of the underlying technology; while the hardware is just the support and the mere computing platform. Thanks to this, Microsoft filled a huge market ruling the era of PC age and consolidating a monopoly. Ruling the software world is very profitable and confortable in contrast to fighting in the hardware arena against so many competitors. We could say, "hardware" is placed in a sane market, where the pace of innovation is much faster and prices are alway falling down.

When the webware became the only thing that matters

So far, applications are pieces of software released, sold, and installed in our machines but things are changing: we are discovering a new world where the user tool is the web and the applications are in the web. Let's imagine to write emails, documents, presentations without leaving the browser. Web applications are services, they don't need to be released with a traditional software lifecycle and are evolving on a daily basis. Companies like Google and Yahoo are not software companies like Microsoft and Oracle as Tim Oreilly well explained in his article on Web2.0. Protopage, gmail, flickr, delicious, upcoming.org, ajaxwrite are just few examples of how we are moving to interact only with web applications. Now the webware is becoming the only thing that matters and the software is blurring quietly in the background joining the poor hardware to compose together the 'mere computing platform'. So the software is the computer and the webware are the applications; the software provides device drivers and multimedia while the webware talks to the users; the software is the engine and the webware is the steering wheel.

Friday, May 19, 2006

Un semplice tool per testare le applicazioni Web con AJAX

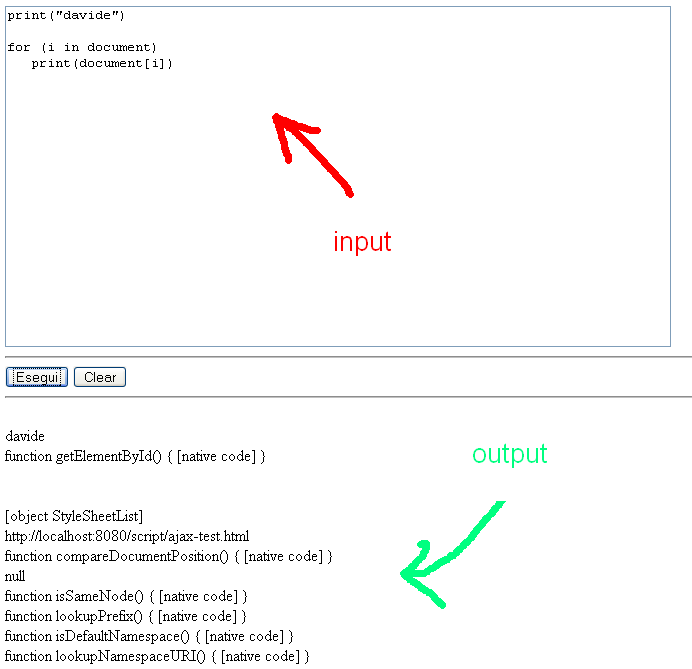
Questo tool serve per testare le proprie applicazioni invocando tramite Ajax le funzionalità remote in modo interattivo. In pratica si tratta di una console Javascript che gira dentro la pagina Web. Il tool e' accessibile all'indirizzo http://people.crs4.it/dcarboni/ajax-test.html ma naturalmente se volete testare i vostri servizi Web dovete scaricare HTML ed il javascript e farne una copia nel vostro sito. In ogni caso nella versione online potete scrivere semplici script che non richiedono Ajax e testarli. Può essere utile quando volete provare un certo costrutto sintattico o quando volete lavorare con il DOM e con gli oggetti del browser.

Qui potete vedere uno screenshot della console:


Il codice HTML/js è il seguente:

<html>

<script src="lib.js"></script>
<script type="text/javascript">
//<![CDATA[

function exec(){
code=document.getElementById("input").value;
try{
eval(code);
}
catch(e){
alert(e);
}


}


function print(s){
output=document.getElementById("output");
output.innerHTML=output.innerHTML+"<br />"+s;
}

function clear(){
output=document.getElementById("output");
output.innerHTML="";
}

//]]>
</script>

<textarea id="input" cols=80 rows=20>
</textarea>
<hr />
<button onclick="exec()"> Esegui </button> <button onclick="document.getElementById('output').innerHTML=''"> Clear </button>

<hr />
<div id="output"></div>
</html>


Per testare un vostro servizio Web con Ajax è molto semplice, la console dispone della chiamata

ajaxCall(url, callback, method, data, errorhandler)

url: url della chiamata HTTP
callback: funzione che gestisce il risultato, deve essere nella forma function(data), dove data è ciò che il server spedisce
method: "GET" | "POST" | "DELETE" | "PUT"
data: i dati che vogliamo spedire al server, ad esempio nella POST
errorhandler: una funzione nella forma function(errorcode, reason){ ...}

Per utilizzare la console è fondamentale che la pagina HTML che la contiene sia pubblicata dallo stesso server Web al quale facciamo le chiamate Ajax, perché invocare servizi su host diversi da quello da cui proviene il codice Javascript non è normalmente consentito dal browser.


Come ultima nota, il codice HTML qui postato fa riferimento ad un file lib.js il cui contenuto lo riporto in linea:

function ajaxCall(url,callback,method,data,errorHandler){
if(!method)
method="GET";

if (!data)
data="";

if(!errorHandler)
errorHandler=function(code,reason){};

req = false;


//In Ajax non si puo' usare una URL di un dominio diverso da quello dello script
//E' una limitazione notevole
// branch for native XMLHttpRequest object
if(window.XMLHttpRequest) {
try {
req = new XMLHttpRequest();
} catch(e) {
req = false;
}
// branch for IE/Windows ActiveX version
} else if(window.ActiveXObject) {
try {
req = new ActiveXObject("Msxml2.XMLHTTP");
} catch(e) {
try {
req = new ActiveXObject("Microsoft.XMLHTTP");
} catch(e) {
req = false;
}
}
}

if(req) {
req.onreadystatechange = function(){

if (req.readyState == 4) {
// only if "OK"
if (req.status == 200) {
callback(req.responseText);
}
else {
errorHandler(req.status,req.responseText);
}
}
};

req.open(method, url, true);
req.send(data);
}
}


Sunday, May 14, 2006

La privacy sul nostro disco (seconda parte)

Nel precedente articolo abbiamo mostrato come installare TrueCrypt e come creare un volume cifrato e come montarlo nel nostro PC, cioè rendendolo visibile ai programmi come un disco. Naturalmente è fondamentale che quando finiamo di leggere e scrivere i nostri dati segreti, smontiamo tale volume dal sistema perché tenerlo montato renderebbe i nostri dati ovviamente disponibili a chi dovesse mettere le mani sul nostro pc mentre noi siamo magari al bagno o alla macchinetta del caffè.

Vediamo ora come configurare Mozilla seamonkey per garantirci una certa privacy, solo locale in questo caso dato che per gli attacchi alla nostra privacy che provengono dalla rete ci vuol ben altro.
Montiamo il nostro disco segreto con TrueCrypt, ad esempio alla lettera Z:, avviamo seamonkey e in Tools->Switch Profile->Manage Profiles ... creiamo un nuovo profilo assicurandoci di scegliere come Folder per questo nuovo profilo una cartella del nostro disco segreto Z:


A questo punto avete creato un profilo che potete usare per navigare senza lasciare tracce nel vostro disco. O meglio le tracce ci sono, ma sono criptate e solo voi potete accedervi. Naturalmente il disco criptato virtuale smontato dopo l'utilizzo e rimontato solo quando necessario. Non usare mai automount per i dischi criptati, non avrebbe senso e azzererebbe
la vostra privacy

Saturday, May 13, 2006

Costruire un Media Center con Linux e Freevo (seconda parte)

 
Telecomando
Nessun media center che si rispetti puo' funzionare senza un telecomando. Quindi me ne sono procurato uno standard fornito di apposito sensore infrarossi da attaccare alla porta seriale (fig.). Per farlo funzionare su Linux occorre installare un apposito driver chiamato Lirc (www.lirc.org). Nel mio caso (Fedora core 3)ho installato con yum i seguenti:
lirc-lib-0.7.2-49.rhfc3.at
lirc-devices-0.7.0-1.rhfc3.at
lirc-0.7.2-49.rhfc3.at
lirc-lib-devel-0.7.2-49.rhfc3.at
lirc-kmdl-2.6.12-1.1378_FC3-0.7.2-49.rhfc3.at

Nota che lirc-kmdl-2.6.12-1.1378_FC3-0.7.2-49.rhfc3.at e` valido per il mio sistema che e` basato su kernel 2.6.12-1.1378. Tale rpm contiene i moduli per il kernel e devono corrispondere. Nel mio caso ho dovuto perfino aggiornare il kernel perche' per il mio vecchio (2.6.9) non riuscivo a trovare i moduli lirc corrispondenti. A questo punto si dovrebbe trovare fra i device

/dev/lirc

o qualcosa tipo

/dev/lirc0

Se non c'e' il device allora c'e' un problema con il caricamento del driver. Nel mio caso ho provato a fare un

modprobe lirc_serial

e mi ha dato un errore del tipo: resource busy. Quindi gugolando un po' ho trovato che il comando:

setserial /dev/ttyS0 uart none

risolveva il problema. Un successivo

modprobe lirc_serial

ha creato il device /dev/lirc0. A questo punto ho lanciato il programma

mode2 /dev/lirc0

e ho cominciato a premere i tasti del telecomando ottenendo a schermo una serie di dati tipo:

pulse 871
space 839
pulse 848
space 840
pulse 848
space 839
pulse 848
space 90856
pulse 850
space 843
pulse 902
space 788

BINGO!! L'hardware funziona! Infatti questo programma visualizza il treno di onda ricevuto dal telecomando senza dover usare un oscilloscopio.


Scheda TV

Questa scheda consente di ricevere il segnale ad alta frequenza dal cavo d'antenna, di sintonizzarsi su un canale e di ricevere il video del programma sullo schermo. Naturalmente fa molte altre cose ma non sto qui ad elencarle. Importante. Bisogna scegliere una scheda supportata dal kernel di Linux. E' noto che le schede con chipset BT878 funzionano bene. Per una lista completa delle schede TV supportate nel kernel date un'occhiata qui: http://www.linuxtv.org/

Nel mio caso ho scelto una scheda analogica. Certo in futuro sarà necessario sostituirla con una scheda per il digitale terrestre o affiancarla ad una scheda per il satellite.

Per una verifica immediata della scheda basta lanciare tvtime (se non ce l'avete do dovrete installare) e giocare un po con i suoi comandi. In figura e' visibile tvtime che gira dentro twm


#